Setting Up a PPTP Server on BuyVM
I got myself a BuyVM VPS some time ago. For 15 USD a year you get 128 MB RAM (256 MB Burst), 15 GB HDD space and 500 GB / month.
Since they enabled GRE and have the proper modules in place, you can easily set up a PPTP server. I used the Ubuntu 10.10 images for this:
- apt-get install pptpd
- open /etc/pptpd.conf and enter the following
1 2 | |
3. echo 1 > /proc/sys/net/ipv4/ip_forward
4. edit /etc/ppp/chap-secrets and add a user (username [tab] pptpd [tab] password [tab] *)
5. set up the iptables rules and replace OUTBOUND_IP_ADDRESS with your server’s IP
1 2 3 4 | |
6. edit /etc/ppp/pptpd-options and enter these options:
1 2 3 4 5 6 7 8 9 10 11 12 13 14 | |
If you want to make these permanent, edit /etc/sysctl.conf and make sure that “net.ipv4.ip_forward=1” doesn’t have a hash (#) in front of it.
After this, copy the iptables rules from above to /etc/rc.local so they are executed on boot.
This should give you an IP from the US that you can connect to with your tech gadgets :)
RoboMop
I bought myself a RoboMop from Amazon DE/Amazon US and so far, I’m pretty happy. I just let it run for 90 minutes and it collects a fair amount of dust and hairs. It uses kind of a random walk algorithm to cover as much ground as possible. (60 sq. m per hour according to the packaging).
Since it’s the softbase version, it even gets into some of the harder to reach corners of my apartment. The only thing I’m not 100% sure about is, how often I should replace the electrostatic pads. For now, I just dust them off on the balcony and put them back on the mop.
Here’s a video of the little ball in action:
You can get the electostatic replacement pads on Amazon Germany (13.99 Euros for 20 pads) and on Amazon US for 7 USD for 20. On Amazon.com, there is also an offer with 24 for 7.50 USD, but I’m not quite sure if they fit 100% (robomaid <-> robomop).
Encrypted Diskimages in OSX
If you're ever in the situation that you want to have sensitive/work data on your mac encrypted but also readily available to work with, you'll probably want to use an encrypted disk image to store your files. The main problem with the disc image is, that mounting it on boot isn't the easiest thing to do. Since there aren't that many guides on it, I though I'd write one myself. Without further ado, here is how you create an encrypted volume and automount it on boot:
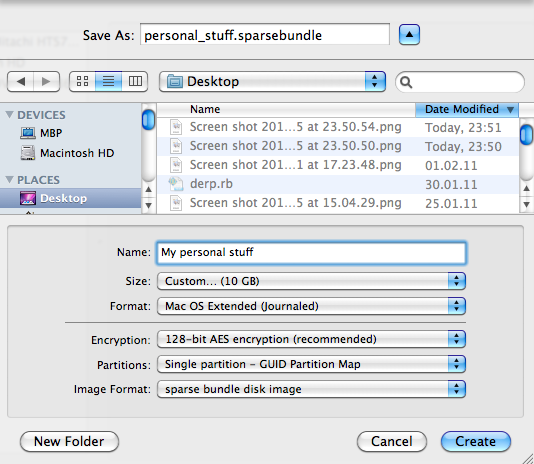
- Open "Disc Utility" and click the new image icon:

- Create a sparse bundle and be sure to enable encryption:
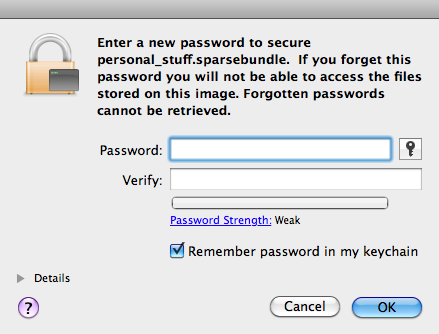
- Enter a password for it:
-
After this, your image should be created and mounted. Go to the terminal and find out its disk device:
After you found out the device, check the image's UUID:$ mount [...] /dev/disk1s2 on /Volumes/My personal stuff (hfs, local, nodev, nosuid, journaled, noowners, mounted by mseeger)
There we go, our image's UUID is 8F37F1F3-71EB-35AA-BED9-237DCD2A0842$ diskutil info /dev/disk1s2 | grep UUID Volume UUID: 8F37F1F3-71EB-35AA-BED9-237DCD2A0842
- Create a folder you want to mount it to later
- Open the system's fstab files by typing "sudo vifs" into the terminal
- Insert the following line, replace UUID and path with your values:
p.s. vifs will put you in VI, so just press 'i' to get into insertion mode and [escape], :wq, [enter] to save the file
UUID=8F37F1F3-71EB-35AA-BED9-237DCD2A0842 /Users/mseeger/stuff hfs rw 1 0
- Drag the sparse image into your user's "login items" (System Preferences) and it will be automatically mounted on boot. Since the image's key will be placed into the keychain that you unlock when you login, the image will be ready to use at the designated folder :)
That's it, have fun :)
Binaergewitter NoSQL
I recently was part of the first episode of the (German language) podcast "Binaergewitter" (roughly: Binary thunderstorm).
The first episode had "NoSQL" as a topic and the four of us talked for 2 1/2 hours about everything in the NoSQL space. We hopefully gave a pretty decent overview over the subject. People seem to like it so far :)
If you always wanted to know what column stores, datastructure stores, document stores, key value stores and graph databases are and German is your cup of tea, you should give it a go.
Here's the link.
Adding Flattr to Serious
After giving it a bit of thought, I decided to reactivate my flattr account. Since the flattr API improved a lot since flattr's early beta days, I thought it would be nice to integrate the auto submission feature with Serious, my current (ruby based) blogging engine of choice.
This blog post will discuss the paramaters that can be used to automatically add the buttons.
The first thing to do will be inserting the javascript part of the integration into our /views/layout.erb file. This file contains (among other things) the header that is part of every page. This code doesn't need any customization and can just be copied into the head section of the HTML
<script type="text/javascript">
/* <![CDATA[ */
    (function() {
        var s = document.createElement('script'), t = document.getElementsByTagName('script')[0];

        s.type = 'text/javascript';
        s.async = true;
        s.src = 'http://api.flattr.com/js/0.6/load.js?mode=auto';

        t.parentNode.insertBefore(s, t);
    })();
/* ]]> */
</script>
The HTML part of the API has to be added to the "/views/_article.erb" template that is responsible for diaplaying the actual content of each blogpost.
In this case, just replace the "data-flattr-uid" value with your fattr username.
<a class="FlattrButton" style="display:none;" title="<%= article.title %>" data-flattr-uid="rb2k" data-flattr-category="text" href="<%= Serious.url + article.url %>"><%= article.title %></a>
This should be it, happy flattr'ing
My Thesis - Building Blocks of a Scalable Webcrawler
In my last semester as a student, I had the chance of working for an awesome company (Acquia) on a very interesting project. It all started with a post over at Dries Buytaert's blog. He is the CTO and co-founder of Acquia (and Mollom), inventor of Drupal, open-source celebrity and also knows a thing or two about FPGA-aware garbage collection :).
I had a great time with a lot of brilliant people and learned tons and tons about datastructures, scalability, nosql, ruby and asynchronous I/O.
This thesis documents my experiences trying to handle over 100 million sets of data while keeping them searchable. All of that happens while collecting and analyzing about 100 new domains per second.
It covers topics from the different Ruby VMs (JRuby, Rubinius, YARV, MRI) to different storage-backend (Riak, Cassandra, MongoDB, Redis, CouchDB, Tokyo Cabinet, MySQL, Postgres, ...) and the data-structures that they use in the background.
Long story short, here we go: [PDF]
p.s. acquia is hiring ;)
Added Caching to My Blog
I decided to beef up my current infrastructure a bit by adding a proper caching layer to my blog.
Serious, my current blogging engine of choice, already generates proper HTTP Cache-Control headers as can be seen in its sinatra routing file:
  before do
    headers['Cache-Control'] = "public, max-age=#{Serious.cache_timeout}"
  end
Since I like to keep my application logic out of the webserver, I decided to use Ryan Tomayko's rack-cache middleware.
While using the nginx-internal caching feature might be the faster solution, I like the feeling that I can actually read the sourcecode easily if I ever happen to encounter bugs.
When looking at the headers of my blog, you can now see a new attribute called "X-Rack-Cache".
When hitting a page that wasn't in the cache, it looks like this:
Age: 0
X-Rack-Cache: miss, store
and if you happen to hit something cached, you'll see this:
Age: 217
X-Rack-Cache: fresh
The "Age" header will tell you how many seconds ago the HTML had been generated. I currently set the maximum cache vaildity time to 300 seconds. If you happen to hit something in the cache that is OLDER than 300 seconds, you should see this:
Age: 0
X-Rack-Cache: stale, invalid, store
Trying to see if the added caching actually made a difference was pretty satisfying:
Before
$ ab -kc 10 -t 30 http://blog.marc-seeger.de/
Server Software:        nginx/0.8.52
Concurrency Level:      10
Time taken for tests:   30.058 seconds
Complete requests:      420
Failed requests:        0
Write errors:           0
Keep-Alive requests:    420
Requests per second:    13.97 [#/sec] (mean)
Time per request:       715.662 [ms] (mean)
Time per request:       71.566 [ms] (mean, across all concurrent requests)
Transfer rate:          150.36 [Kbytes/sec] received

Connection Times (ms)
              min  mean[+/-sd] median   max
Connect:        0    0   2.4      0      16
Processing:    89  704 873.3    530    9556
Waiting:       72  654 870.6    498    9539
Total:         89  705 873.5    530    9556

Percentage of the requests served within a certain time (ms)
  50%    530
  66%    572
  75%    613
  80%    671
  90%   1055
  95%   1448
  98%   2804
  99%   5267
 100%   9556 (longest request)
After
$ ab -kc 10 -t 30 http://blog.marc-seeger.de/

Server Software:        nginx/0.8.52
Concurrency Level:      10
Time taken for tests:   30.007 seconds
Complete requests:      7165
Failed requests:        0
Write errors:           0
Keep-Alive requests:    7099
Requests per second:    238.78 [#/sec] (mean)
Time per request:       41.880 [ms] (mean)
Time per request:       4.188 [ms] (mean, across all concurrent requests)
Transfer rate:          2203.54 [Kbytes/sec] received

Connection Times (ms)
              min  mean[+/-sd] median   max
Connect:        0    0   1.6      0      18
Processing:    18   42  69.4     34    2433
Waiting:       17   39  64.9     32    2401
Total:         18   42  69.8     34    2433

Percentage of the requests served within a certain time (ms)
  50%     34
  66%     37
  75%     40
  80%     43
  90%     61
  95%     74
  98%     86
  99%    121
 100%   2433 (longest request)
Not too shabby :)
p.s. when configuring rack-cache, the "allow_reload" option should be set to false unless you want to allow everybody to forcefully ignore your cache.
Prime Numbers in Ruby
Just a little experiment to see how fast I could generate prime numbers in Ruby.
The shackspace public mailing list had a fun little thread where people would implement an algorithm to find primes in the first 2500000 numbers.
While I knew that Ruby wouldn't score well on the performance side of things, I thought I could at least give it a try and see how Ruby 1.9.2, Rubinius and JRuby would perform in the end.
Here is the code, a simple sieve of eratosthenes:
def prime_sieve_upto(n)
  all_nums = (0..n).to_a
  all_nums[0] = all_nums[1] = nil
  all_nums.each do |p|
    #jump over nils
    next unless p
    #stop if we're too high already
    break if p * p > n
    #kill all multiples of this number
    (p*p).step(n, p){ |m| all_nums[m] = nil }
  end
  #remove unwanted nils
  all_nums.compact
end

starting = Time.now
amount = 2500000
primes = prime_sieve_upto(amount)
puts "Found #{primes.size} in the numbers from 0 to #{amount} in #{Time.now - starting}s"
On my Macbook Pro (2.6 GHz Core2Duo), the different VMs perform as follows:
ruby 1.9.2p0 (2010-08-18 revision 29036) [x86_64-darwin10.4.0]:
$ ruby prime_fast.rb
Found 183072 in the numbers from 0 to 2500000 in 3.543216s
rubinius 1.1.1 (1.8.7 release 2010-11-16 JI) [x86_64-apple-darwin10.4.0]
$ rbx prime_fast.rb
Found 183072 in the numbers from 0 to 2500000 in 1.333367s
UPDATE:
rubinius 1.2.0 (1.8.7 release 2010-12-21 JI) [x86_64-apple-darwin10.4.0]
$ rbx prime_fast.rb
Found 183072 in the numbers from 0 to 2500000 in 1.277507s
JRuby 1.5.6:
$ java -Xmx1024m -jar Downloads/jruby-complete-1.5.6.jar prime_fast.rb
Found 183072 in the numbers from 0 to 2500000 in 1.804s
Nice to see rubinius up there :)
Shared Groups in Prosody
My favourite Jabber Server (Prosody) has a plugin to automatically inject groups into a persons roaster.
I use this at my university to create groups for every semester (MIB1, CSM3, ...) and fill them with the students using a ruby script that dumps LDAP.
My initial problem was that the injected contacts didn't have a name but just their JID. The mod_groups documentation doesn't mention anything related to names, but the sourcecode of the module has this interesting line:
local entryjid, name = line:match("([^=]*)=?(.*)");
This assigns a value to the two variables according to the matches that the regular expression returns.
So to have the names injected, the groups.txt file has to have the JID and the name seperated by an equals sign. So this is what the format looks like:
[email protected]=John Doe
[email protected]=Jane Doe
This way, you can inject jids AND names :)
Printing From Commandline in OSX
I just had to print out >10 pictures and didn't actually want to open each one of them and print it individually.
An easy solution in OSX for this is to use the "lp" utility which will be able to print out a lot of formats (e.g. pictures or pdf files).
If you don't want to use the default printer, just look up what the one you want is called by using:
$ lpstat -a
and then printing the files using (in my case: a bunch of jpeg files):
lp -d "my_printer_name" *.jpg
If you just want to use the default printer, you can leave away the -d option.