Linux on the MSI Wind U115 With the GMA 500
The GMA500 chipset which was licensed by Intel but originated at PowerVR has a pretty bad Linux support.
While there IS a driver, it is mostly closed source, shippes its own DRM module and is basically a big bag of hurt.
While there was some stuff to make it run on Ubuntu, I was never really able to have any success with following those guides.
Turns out, the driver used had a bug with the MSI Wind series of netbooks.
Luckily, linux-tipps.blogspot.com had an perfect how-to and a prepatched driver available over here.
I'm now running a fully functional Ubuntu 9.10 with the latest kernel updates and a bunch of applications at about 50% the size of the previous Windows 7 installation. This has the advantage that it actually fits perfectly on the netbooks SDD.
Setting Up Prosody to Authenticate Against LDAP
UPDATE: There is another guide that shows this setup on more current prosody version over here.
A few years ago, I set up a Jabber server at my university. It worked pretty fine in the beginning, but a lack of updates and a horrible java-overengineering led to the point where the server needed 400 MB of RAM and didn't even consider talking to LDAP anymore.
Since I had no intention of setting up openfire again, I decided to look for other tools.
There is ejabberd, but since I can barely read erlang, let alone write, I decided that I don't really want to deal with ejabberd :)
There also is Tigase, an open-source java based xmpp-server. Since I had bad experience setting up the whole java-enironment, I'd rather not try it again. There also is no support for authenticating against LDAP with Tigase at the time of writing.
The next contestant was Prosody. By simple looking at the website, you see the difference. Where as Tigase and ejabberd are basically a huge, ugly wall of text, prosody is a clean and simple lightweight design.
Prosody is written in Lua. While lua wasn't all thaaat slow to begin with (for a scripting language), since luajit came up, it is only arround 2 times slower than C, according to the benchmarks.
My problem with prosody in the past was the missing LDAP authentication feature. It wouldn't have been all that hard to implement it for somebody that actually knew lua, but I decided that I have other things to do at the moment. This is why this commit cought my eye:
first working version with Cyrus SASL support.
To quote from the ?official website?:
SASL is the Simple Authentication and Security Layer, a method for adding authentication support to connection-based protocols.
Cyrus SASL is a matching library. Here is a quote from its freshmeat page:
The Cyrus SASL library is a generic library for easy integration of secure network authentication to any client or server application. It supports authentication via standard plaintext methods as well as CRAM-MD5 and DIGEST-MD5 shared secret methods and KERBEROS_V4 and GSSAPI Kerberos methods. The SASL protocol framework is used by SMTP, IMAP, ACAP, LDAP, and other standard protocols.
Prosidy uses lua-cyrussasl (which basically can't be found using google) to communicate with the library.
Getting sasl to run and auth against LDAP
While I don't remember everything I installed, here are some packages that seem appropriate:
cyrus-sasl-2.1.22-5.el5
cyrus-sasl-plain-2.1.22-5.el5
cyrus-sasl-lib-2.1.22-5.el5
cyrus-sasl-devel-2.1.22-5.el5
cyrus-sasl-md5-2.1.22-5.el5
cyrus-sasl-ldap-2.1.22-5.el5
cyrus-sasl-ntlm-2.1.22-5.el5
This will also install programs such as "testsaslauthd", "sasl2-sample-client", "sasl2-sample-server", "sasl2-shared-mechlist" and "sasl2-static-mechlist". They are very useful to see if your configuration is actually ok.
Now, set up your /etc/saslauthd.conf:
# cat /etc/saslauthd.conf
ldap_servers: ldap://ldap1.example.org
ldap_search_base: ou=userlist,dc=example,dc=org
After this (and maybe a /etc/init.d/saslauthd restart), the testsaslauthd command should work:
# testsaslauthd -u existing_user -p thepassword
0: OK "Success."
# testsaslauthd -u blabla -p narf
0: NO "authentication failed"
This just set up the connection info for the saslauth daemon. To be able to auth against this, you'll need to set up a matching service.
This is basically just a config file that tells the cyrus-sasl library which service to auth against. For this, you'll have to set up your /usr/lib64/sasl2/xmpp.conf (or /etc/sasl2/xmpp.conf )
# cat /usr/lib64/sasl2/xmpp.conf
pwcheck_method: saslauthd
mech_list: PLAIN
This means that the service called "xmpp" (from the filename) only accepts plain passwords and uses the saslauth daemon to check them.
Check if this works by starting the sample server:
# sasl2-sample-server -s "xmpp" -m "PLAIN"
trying 10, 1, 6
trying 2, 1, 6
bind: Address already in use
and connect to it using the sample client (probably in another terminal session):
# sasl2-sample-client -s "xmpp" -m "PLAIN" localhost
receiving capability list... recv: {5}
PLAIN
PLAIN
please enter an authentication id:
please enter an authorization id: YOURUSERID
Password: YOURPASSWORD
send: {5}
PLAIN
send: {1}
Y
send: {22}
youruserid[0]youruserid[0]yourpassword
successful authentication
closing connection
So far so good. You've set up a proper saslauthd and configured a service called xmpp.
Now:
Getting Prosody
There are installers/packages available for Debian/Ubuntu, Windows, Arch Linux, FreeBSD and Windows. The problem is that, at the time of writing, the sasl support hasn't made it into a stable build yet. That's why I decided to go for the current development version. I simply checked out the git mirror of their official repository (didn't have hg installed):
git clone http://github.com/bjc/prosody.gitAs for other libraries, those are the ones:
liblua5.1, libssl (OpenSSL), libidn11
And the lua stuff you need (as far as I can remember):
lua-luasocket, lua-luasec, lua-expat, lua-cyrussasl (see above), lua-filesystem
You can get the them using your distributions package manager, luarocks (for the lua stuff) or download and compile them yourself.
After everything is installed, just do the usual:
./configure --ostype=linux   <-- can be "debian" or "macosx" too
make
make install
Configuring Prosody
In my case, the config file was copied to "/usr/local/etc/prosody/prosody.cfg.lua". After you configured the usual stuff (hostname, TLS/SSL, admins, ...) you have to put in the config option for the cyrus support to use the proper service to auth against:
cyrus_service_name = "xmpp"Currently, there also is a problem that should be fixed within a couple of days: In the file /util/sasl_cyrus.lua, you have to edit line 34.
pcall(cyrussasl.server_init, "prosody")the "prosody" string has to have the name of your service (e.g. xmpp) for it to work.
This should allow prosody to authenticate against LDAP using cyrus-sasl.
Have fun :)
Update fresh from the prosody chatroom:
(11:35:35 PM) darkrain: One minor thing, is that with the release of 0.7, you'll need to put sasl_backend="cyrus" in the config file
(11:35:41 PM) darkrain: and the default value of cyrus_service_name is "xmpp"
(11:35:54 PM) darkrain: (and the pcall thing has been fixed)
(11:36:01 PM) darkrain: s/One/three/
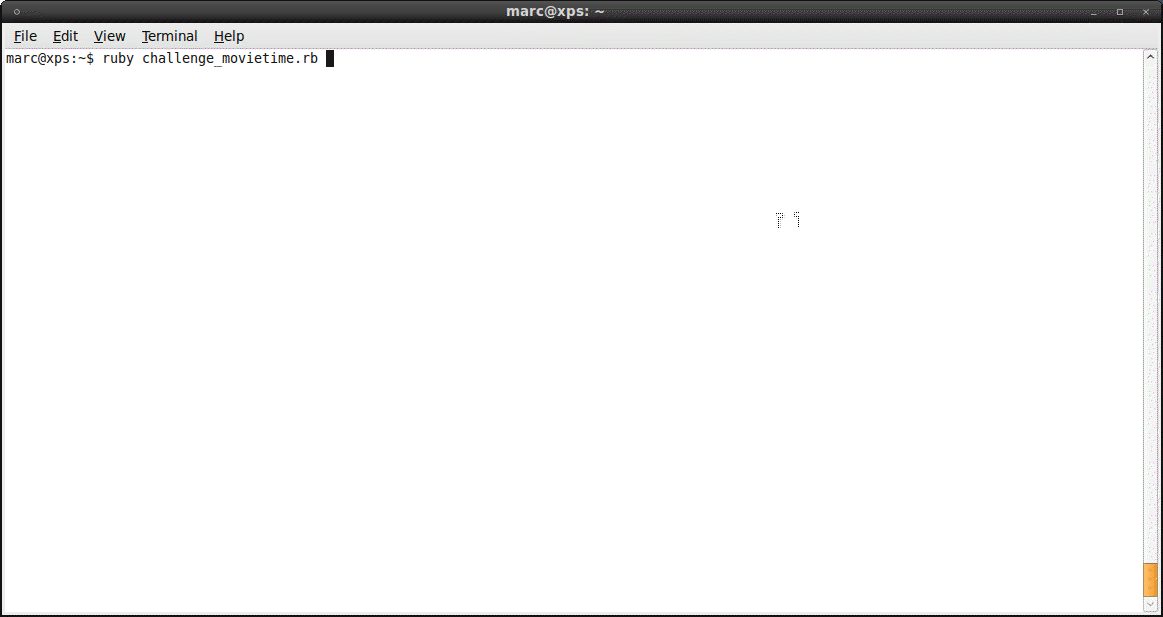
Maze Solver
Just submitted my solution to the Ruby programming challenge for newbies #5
put the mouse over the image to see the result :)
Online Backup and Sync With SpiderOak
I decided that, while my old rsync/unison backup solution was working fine, I needed something else.
I recently got a netbook and wanted to be able to keep my documents between my laptop and the netbook in sync.
While rsync/unison worked ok, there were some encoding errors in filenames and the "manual" start of the backup always felt kinda strange.
I already had dropbox (ref link) on my laptop and was pretty happy with it. It worked fine but the space is limited and the pro account was too expensive for my taste. I also didn't want to store my files unencrypted in the cloud.
While dropbox offers a headless install for e.g. my v-server, it is pretty annoying that dropbox only has ONE folder that it is able to backup and this folder also always syncs completely.
![]()
I then stumbled upon Spideroak (ref link). The SpiderOak team immediately appeald to my nerdy side by having an engineering matters section on their site, complete with crypto details (2048 byte RSA and 256 bit AES, using a key created by the key derivation/strengthening algorithm pdkdf2 (using sha256), with 16384 rounds, and 32 bytes of salt).
The service is completely cross platform (I'm currently running it on Ubuntu 9.10 x86_64, 9.04 x86 server and 32bit Windows 7).
The allow people to select which folders they want to backup and which of those they want to sync with other computers.
They offer a commandline mode which has a whole bunch of options:
# SpiderOak --help
Usage: SpiderOak basic command line usage:

Options:
  --version             show program's version number and exit
  -h, --help            show this help message and exit
  -v, --verbose         be verbose: show detailed status information as it
                        happens
  -d NUMBER, --device=NUMBER
                        operate on specified device id (default is the local
                        device)
  -o DIR, --output=DIR  Target dir to restore items to (default is normal
                        download dir)
  --enable-schedule     honor the set activity schedule, even in batchmode
                        (normally the schedule is ignored in batchmode)
  --disable-schedule    disable activity scheduling

  Operational Modes and Commands:
    --backup=TARGET     ad hoc operation: backup whatever exists at TARGET in
                        the filesystem and exit (ignores existing backup
                        selection.)
    --restore=item      Restore a folder, file, or version.
                        Run "--restore help" for more info
    --headless          run in headless mode (without the graphical interface)
    --batchmode         like headless, but will exit when all available work
                        is done
    --sync              like batchmode, but only backup/update synced folders
    --scan, --scan-only
                        scan the filesystem for changes and report a summary
    --build, --scan-and-build-only
                        scan the filesystem, and build all possible file
                        system changes as shelved upload transactions, and
                        exit without uploading them
    --merge             merge and restore the contents of multiple paths from
                        arbitrary devices:  dev1:path1 .. devN:pathN
    --purge=item        purge a folder, file (including historical versions)

  Information Commands:
    --userinfo, --user-info
                        Show user and device info
    --space             Show space usage information by category and by device
    --tree              Show the hierarchy of stored backup folders
    --tree-changelog    Show a log of how the hierarchy of stored backup
                        folders has changed over time
    --journal-changelog=folder_or_journal
                        Show the changelog of a given folder
    --shelved-x, --print-shelved-x
                        Show information about each shelved upload transaction
    --fulllist          Show all folders and files stored on device

  Backup Selection Manipulation Commands:
    --selection, --print-selection
                        Show a list of selected and excluded backup items
    --reset-selection   Reset selection (but preserve excluded files)
    --exclude-file=EXCLUDE_FILE
                        Exclude the given file from the selection
    --exclude-dir=EXCLUDE_DIR
                        Exclude the given directory from the selection
    --include-dir=INCLUDE_DIR
                        Include the given directory in the selection
    --force             Do in/exclusion even if the path doesn't exist

  Maintenance Commands:
    --vacuum            Vacuum SpiderOak's local database (rebuilds indexs and
                        reclaims local disk space)
    --destroy-shelved-x
                        destroy each shelved upload transaction already in
                        progress.
    --repair            repair a local SpiderOak installation
    --rebuild-reference-database
                        rebuild the SpiderOak reference database (can take
                        awhile)
    --billing           print a secure web auto-login URL for billing info

  Dangerous/Support Commands:
    Caution: Do not use these commands unless advised by SpiderOak
    support.  They can damage your installation if used improperly.

    --empty-garbage-bin
                        purge all deleted items on the current device
    --apply-subscription-xact
                        apply all transactions previously received from remote
                        devices -- (not intended for general use -- this
                        normally happens automatically)

  Account Commands:
    --bootstrap=ACCOUNT_DEFINITION_FILE
                        Read a json definition file and use contents to create
                        a new account
There is a lot of tutorials and a faq that also answers technical questions.
The best thing: thanks to an education discount (you can ask me for the voucher code if you don't have an .edu email address from your university), I only pay 5 usd/month for 100 GB of backup space!
To install it on a headless webserver, just download the regular installer package for your distribution and launch spideroak one time using x-forwarding:
- be sure you've got the "xauth" package installed
- ssh -X your.server.com
- /usr/bin/SpiderOak
- set up what you want to
- finally, add this entry to your crontab:
@reboot /usr/bin/SpiderOak --headless &
This will start SpiderOak on every reboot and backup files according to your wishes.
Some other random facts about SpiderOak:
- you can select an ftp/sftp where spideroak should store a copy of the encrypted blocks. this can e.g. be a local NAS. This will speed up restore procedures (I don't use it, but nice to have)
- spideroak allows to share files over the web, including picture galleries (all of that password protected)
- you can stop uploads and resume them
Migrated to MongoDB
I decided to procrastinate the hell out of this evening.
I spent the last 5 hours to completely rewriting the backend of my blogging-engine.
It used to be: redis
It now is: mongoDB
I saved TONS of code and have a really simple data-schema now :)
On the downside: the code is really unoptimized at the moment and basically uses a "brute force" approach to a lot of things.
Comparing the two, I have to say:
redis is simpler
MongoDB has awesome query options and is a bit better suited if I ever want to put other stuff on there (which I will!).
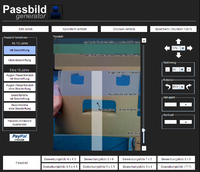
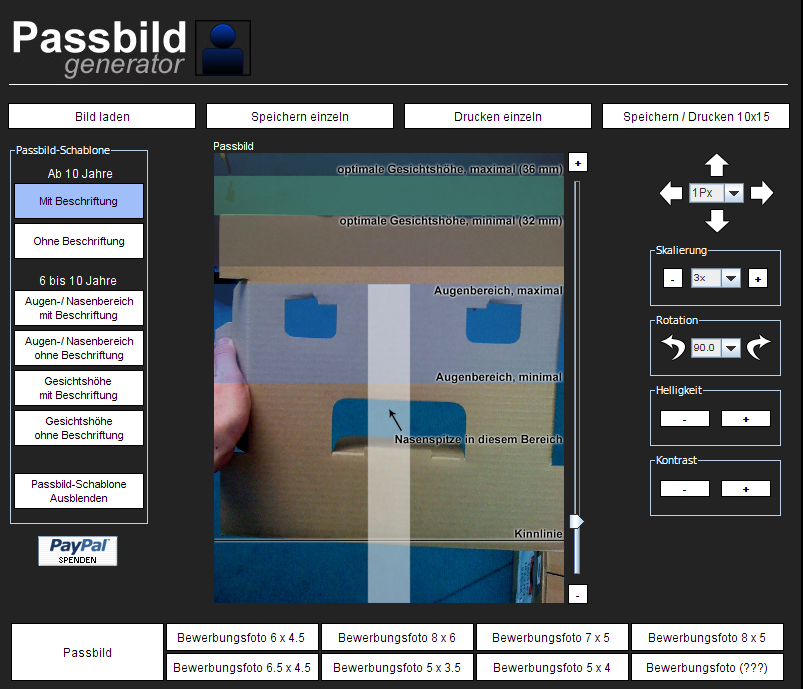
Biometrische Passfotos Selbstgemacht
This one is in German as the whole "biometric german ID card" deal probably has a 99% German target audience :)
Ich kam unlängst in die Situation mir einen Reisepass ausstellen lassen zu müssen. Das Problem ist, dass man für diesen Pass nicht irgend ein beliebiges Passbild nehmen kann, sondern ein "biometrisches" benötigt.
Biometrisch bedeutet in diesem Fall, dass ein Computer mit schlecht geschriebener Software die Gesichtsmerkmale auch noch identifizieren kann.
Das hat zur Folge dass man auf einem biometrischen Passbild folgende Sachen machen sollte:
- Gerade in die Kamera schauen (nicht den Kopf schräg halten)
- Neutraler Gesichtsausdruck (nicht Lächeln)
- Gut Ausgeleuchtetes Bild (keine riesen Schatten im Gesicht, nicht zu hell, nicht zu dunkel, keinen Farbstich)
- Kontrastreicher, einfarbiger Hintergrund
- Gesicht erkennbar (Keine Haare im Gesicht, nicht die Augen geschlossen, keine Mütze im Gesicht, keine Sonnenbrille)
- ...
Genauere Hinweise mit Beispielen bekommt man bei der Bundesdruckerei.
Ich hatte keine besondere Lust mir einen Fotografen zu suchen und x Euro zu zahlen nur damit jemand eine Kamera bedient und 2 Minuten mit Photoshop (wenn überhaupt) spielt.
Glücklicherweise besitze ich eine Digitalkamera und bin über die Seite passbild-online.de gestoplert.
Lange rede kurzer Sinn:
- Selber vor ruhigem Hintergrund mit Digicam fotographiert
- Bild in Gimp (oder einem anderen Programm eurer Wahl) halbwegs zurecht geschnitten (genaue Daten wären: Breite von 35 mm und Höhe von 45 mm bei Auflösung von 300 dpi)
- Foto zu passbild-online.de hochgeladen
- √úberprüfen ob die Biometrischen Verhältnisse Stimmen:
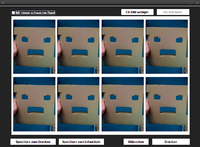
- Passbild auf entsprechendes Fotoformat vervielfachen lassen und speichern ("Speichern/Drucken 10x15"):
- Zum Fotoservice eures Vertrauens gehen und Bild entwickeln lassen. Ich habe mich mal für den Mediamarkt entschieden.

Durch die Abholung im lokalen Mediamarkt entstehen gigantische kosten von 8 cent für 8 Passbilder :)
18.12.09 - IBM Day
Some copypasta:
Feel free to join us at this (free) event. You will get an overview of what is currently happening in information technology and you will be able to discuss the consequences and problems.
If you can't be here in person you might want to watch the IBM Day at http://days.mi.hdm-stuttgart.de.
Live-Stream and Live-Chat are available.
Friday, 18.12.2009, 14:00 Uhr - 18:30 Uhr, room 65 Hochschule der Medien, Nobelstrasse 10, Stuttgart Directions
Agenda:
14:00 - 14:10 Welcome, Bernard Clark, Walter Kriha
14:10 - 15:10 Michael Lorenz: EA Management Methodik - Dokumentation
15:10 - 15:25 Break
15:25 - 16:25 Niko Stotz: Projekterfahrung mit modellgetriebener Softwareentwicklung
16:25 - 16:40 Break
16:40 - 17:40 Peter Kutschera u. Philipp Schöpf: Performanzuntersuchungen von JEE-Anwendungen
17:40 - 17:55 Break
17:55 - 18:15 Peter Demharter: Cloud Computing
18:15 - 18:30 Wrap-up, Bernard Clark, Walter Kriha
I'll be there :)
Update the Nokia E71 by Changing Its Product Code
Nokia recently released the E71 firmware 400.21.013 v6 Euro which had some nice additional features (Ovi Contacts preinstalled) and tweaks (Camera functionality improved).
Strangely, the nokia updater didn't show that update for me at first and still insisted that my 300.x version was the current one for my phone.
The reason for this is, that the Nokia E71 devices are being released into different markets with different product codes. The updates are also released for different product codes at different times. This is probably due to the fact that some phone providers aren't keen on supporting the failed update procedures of their users or have to adapt their branding mechanisms to the new firmware.
To be able to change my software code to something "more pleasing" for the Nokia Updater, I had to do the following:
- Install the usual nokia drivers etc that come with the nokia ovi suite/updater
- Download and install the Nemesis Service Suite (NSS) from B-Phreaks. Select "Virtual USB" during the installation
After you started NSS, follow these steps:
- click on the magnifying glass in the upper right corner
- click on the "phone info" tab
- click "read" to read in your phone's data
- click the "enable" checkbox next to the product code item
- insert a proper product code. A list can be found here. I decided to go with the German one: 0558785. I wouldn't try anything out of your region. The European one e.g. changed my keyboard layout (no more umlauts and some other stuff)
- click "write"
The software doesn't seem to do anything, but if you click on "read" again, it will display the new code.
You should now have a changed product code and the Nokia Updater will probably find the missing update and install it now :)
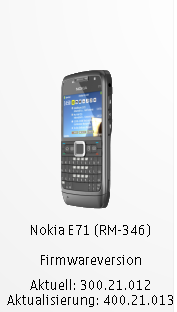
p.s. as usual: this might damage your phone, you do this AT YOUR OWN RISK!
Downloading Defcon 17 Videos
Ever since the defcon 17 videos were released a few days ago, I wanted to download them to be able to watch them on my standalone player.
The organizers of defcon are nice enough to create an RSS feed for the specific files (audio only, slides + speaker video + audio, only slides video + speaker audio). I thought about simply adding the feed to gpodder, but I really wouldn't want it to clutter my other feeds that actually DO have updates from time to time, so I decided to go the console way:
Download the rss file:
wget http://www.defcon.org/podcast/defcon-17-video.rssGet the enclosure links out of the RSS Feed and write them to a text file:
cat defcon-17-video.rss | grep enclosure | grep -o https://.*.m4v > linklist.txtDownload the textfile using wget:
wget -i linklist.txtTadaaaa, done :)
Impressed by Maglev
The guys from Gemstone describe maglev as:
MagLev /măg-lĕv/ n. a fast, stable, Ruby implementation with integrated object >persistence and distributed shared cache.
Outside of computer science, "MagLev" usually stands for "magnetic levitation" as employed by some monorail trains.
Today I noticed the the announcement on their googlegroup, for the release of a public alpha.
Installing it isn't all that hard (on Linux at least). Just download the installer, extract it and running the installer:
./installMaglev.sh 22578
This will tell the installer to fetch version 22578 (the current version as I write this according to their github repo) and extract it. This will extract "gemstone" and "maglev" to the installer directory.
Gemstone is a distributed object persistence server initially developed for smalltalk, maglev is their Ruby vm.
After that, you can decide where to move those two directories and simply add the following environment variables
export MAGLEV_HOME=/whereever/you/copied/it/
export PATH=$MAGLEV_HOME/bin:$PATH
after you've done this, you should be ready to go.
Just start up the maglev server using:
maglev start
and you can start using the following commands:
- maglev: start and stop the server
- maglev-gem: install gems for maglev
- maglev-irb: interactive maglev shell
- maglev-ruby: execute ruby scripts
Seeing as there is the first public alpha release of maglev I decided to look at the speed of it all. I still had some computation intensive things:
uebung2.rb is a simple Diffie-Hellmann key exchange ( g = 7789, p = 1017473. Alice‚Äôs Secret Key α is 415492 and Bob‚Äôs Secret Key β 725193.)
uebung3a.rb is a (3 person) group key exchange according to Ingemarsson, Tang and Wong.
uebung3b.rb is a (3 person) group key exchange according to Burmester and Desmet.
I uploaded the sources to this gist
I used the following versions:
$ ruby --version
ruby 1.9.1p243 (2009-07-16 revision 24175) [x86_64-linux]$ maglev-ruby --version
maglev 0.6 (ruby 1.8.6) (2009-11-20 rev 22578-1067) [x86_64-linux]
Without further ado, here are the numbers:
Uebung 2:
ruby 1.9.1
$ time ruby uebung2.rb
Generator: 7789
Prime: 1017473
[...]
bob's key: 707860
alice's key: 707860
real 0m0.322s
user 0m0.300s
sys 0m0.020s
maglev
$ time maglev-ruby uebung2.rb
Generator: 7789
Prime: 1017473
[...]
bob's key: 707860
alice's key: 707860
real 0m0.726s
user 0m0.250s
sys 0m0.080s
Uebung 3a:
ruby 1.9.1
$ time ruby uebung3a.rb Generator: 7789
Prime: 1017473
[...]
alice's group Key: 470113
bob's group Key: 470113
carol's group Key: 470113
real 0m0.710s
user 0m0.700s
sys 0m0.010s
maglev
$ time maglev-ruby uebung3a.rb
Generator: 7789
Prime: 1017473
[...]
alice's group Key: 470113
bob's group Key: 470113
carol's group Key: 470113
real 0m0.971s
user 0m0.480s
sys 0m0.090s
Uebung 3b:
ruby 1.9.1
$ time ruby uebung3b.rb
Generator: 7789
Prime: 1017473
[...]
ROUND TWO
[...]
GROUPKEY
alice's group Key: 648631
bob's group Key: 648631
carol's group Key: 648631
real 0m1.159s
user 0m1.130s
sys 0m0.020s
maglev
$ time maglev-ruby uebung3b.rb
Generator: 7789
Prime: 1017473
[...]
ROUND TWO
[...]
GROUPKEY
alice's group Key: 648631
bob's group Key: 648631
carol's group Key: 648631
real 0m1.262s
user 0m0.770s
sys 0m0.080s
I'd say that's a pretty good start :)
A good explenation what "real", "user" and "sys" mean can be found on stackoverflow, here's the quote:
Real is wall clock time - time from start to finish of the call. This is all elapsed time including time slices used by other processes and time the process spends blocked (for example if it is waiting for I/O to complete).
User is the amount of CPU time spent in user-mode code (outside the kernel) within the process. This is only actual CPU time used in executing the process. Other processes and time the process spends blocked do not count towards this figure.
Sys is the amount of CPU time spent in the kernel within the process. This means executing CPU time spent in system calls within the kernel, as opposed to library code, which is still running in user-space. Like 'user', this is only CPU time used by the process
Here are some more links:
the rdoc
the official homepage
the maglev github repo